 “D.A. Custom Forms” Documentation by “d_atanasov” v1.0
“D.A Custom Forms ”
Created: x/x/xxxx
By: Daniel Atanasov
Email: atanasov.daniel@gmail.com
Thank you for purchasing DA Custom Forms Set. If you have any questions that are beyond the scope of this help file, please feel free to email via my user page contact form here. Thanks so much!
Table of Contents
- What is this?
- Features
- How does it work?
- HTML Structure
- CSS Files and Structure
- JavaScript
- Sources and Credits
- Any additional unique features that need an overview
A) What is this - top
D.A. Custom Forms is a set of responsive layout HTML/CSS forms validated via javascript. There are 3 layouts of the forms: vertical , horizontal and modal. The vertical mode structure is label and a field underneath, horizontal - label next to the field and modal type popups the form. The forms are with responsive design , so they are optimized for mobile devices.
B) Features - top
- Responsive design layout
- Client side validation
- Custom Colors
- Creation of your own rules (Plugin supports custom validation methods. So if you need some specific validation rule it is not a problem)
- Nice Tooltips
- Nice animations
- 4 states of the elements( normal, focused, error, succes )
- Fully customized(Contains large amount of customized elements: inputs, textareas, selects, radios, checkboxes and buttons)
- Cross-browser platform - Tested on Chrome, Firefox, Opera, IE8, IE9, IE10) iOS (iPhone, iPad) and Android.
- Free Updates
- Free Support
C) How does it work? - top
-
Step1
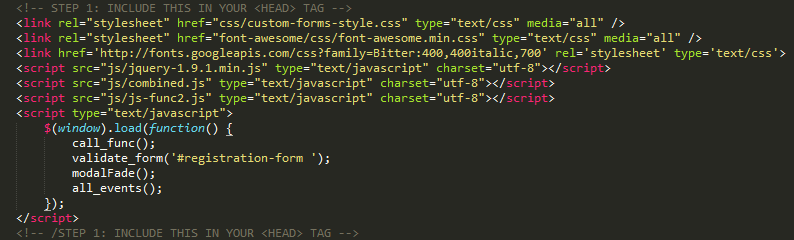
First of all you have to paste the following code in to your head section of HTML file:
-
Step2
Add class DA_custom_form to your form :

-
Step3
You have to follow the HTML structure described in the next chapter, and to add the form elements you need. And that's all.
D) HTML Structure - top
Below is shown an example of the HTML structure of the forms
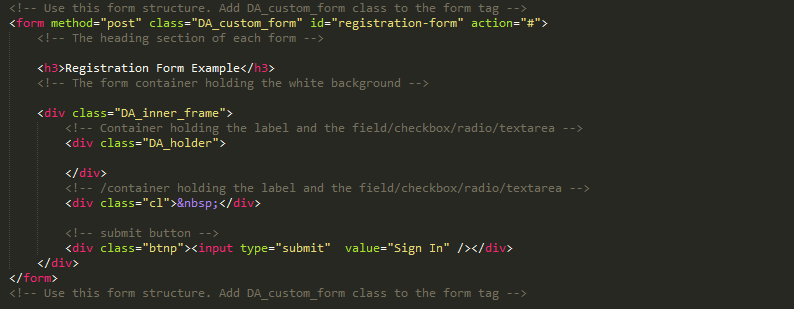
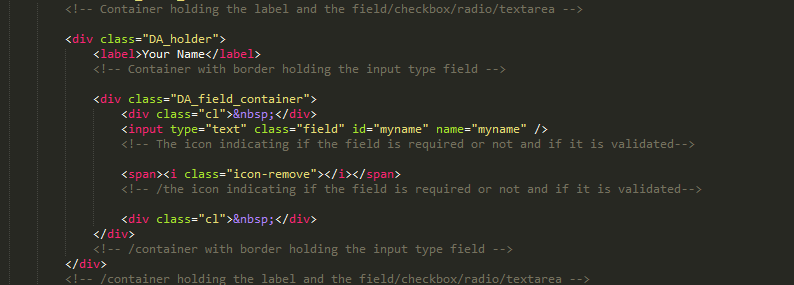
In each DA_holder you may put your pair of label and form element( text field, checkbox. radio and textarea). In the examples below you add a pair of label and text field.
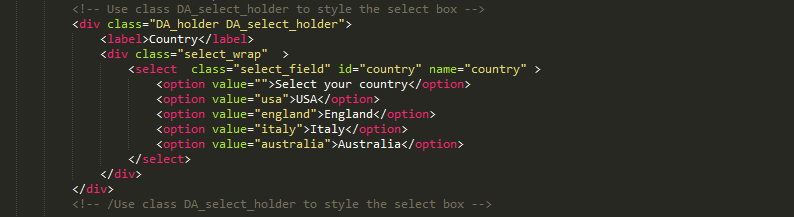
How to add custom select box:
Add a custom checkbox:

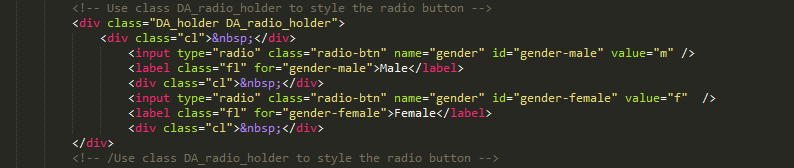
Add custom radio buttons
Add custom submit button

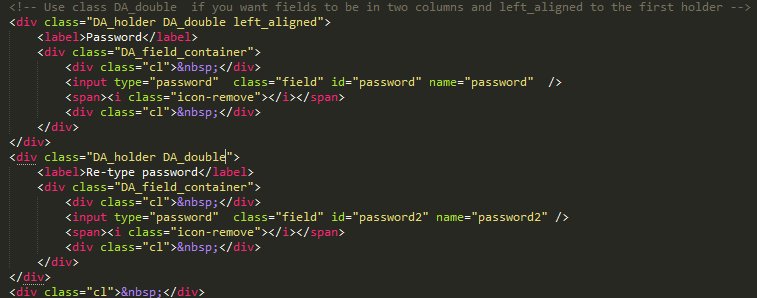
In vertical mode, there is an option if you want to place two fields + labels next to each other (in 2 columns). Then you have to put class="DA_double" in each "DA_holder" and left_aligned class to the first field holder like shown below.
If you want to use the horizontal layout you just have to add a class horizontal like shown below.

In horizontal mode if you use longer label you have to put the label class="dbl-lbl"

E) CSS Files and Structure - top
I am using the style.css file where is the sceleton of the forms and the elements inside (text fields, checkboxes, radio buttons, select boxes). In this file you can customize the default colors, sizes, font-sizes of the form elements.
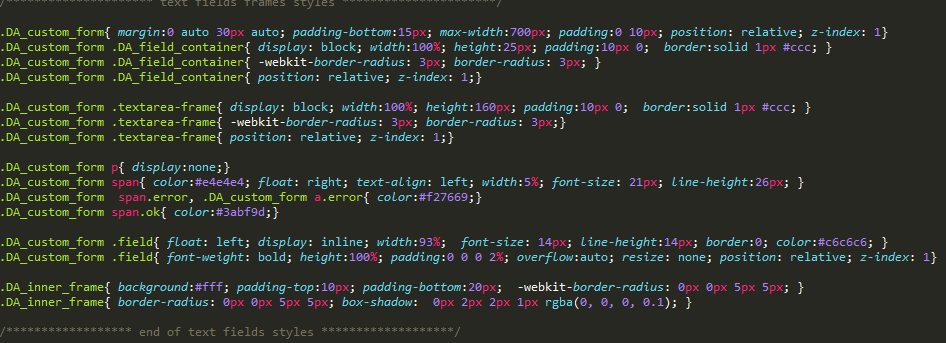
You can customize the color of the validation signs placed in the end of the fields in the following lines.

You can also easily customize the style of the submit buttons by the lines listed below.

The second file called font-awesome.min.js contains all the styles for the font that is used for the validation icons at the end of the fields. For more details about font awesome follow the link
C) JavaScript - top
This theme imports three Javascript files.
- jQuery
- My custom scripts
- Some plugins grouped in one file

- jQuery is a Javascript library that greatly reduces the amount of code that you must write.
- Most of the animation in this site is carried out from the customs scripts.
- In addition to the custom scripts, I implement the jQuery Validation Plugin.
In this function is validating 3 forms, added in the example(registration-form, contact-form and login-form).
In the vertical.html file is shown the usage of the validation plugin with a lot of predefined validation rules. To use the validation with your form just put your form id in the folowing function in the head section of your html file.
validate_form('#your-form-id');By adding this line you will be able to use all preliminary defined validation rules by simply adding name attribute to the form elements you want to validate.
Here are the predefined validation rules:
name: {
	required: true,
	minlength: 3
},
password:{
	required: true,
	minlength: 5
},
password2: {
    required: true,
    minlength: 5,
    equalTo: "#password"
},
email: {
    required: true,
    minlength: 6,
	email: true
},
country: {
	required: true
},
gender: {
	required: true
},
terms:{
	required:true
},
url:{
	required:true,
	url: true
},
rangelength:{
	required:true,
	rangelength: [2, 6]
},
range:{
	required:true,
	range: [2,6]
},
phone_us:{
	required:true,
	phoneUS: true
},
number:{
	required:true,
	number:true
},
min:{
	required:true,
	min: 12
},
maxlength:{
	required:true,
	maxlength:4
},
nowhitespace:{
	required:true,
	nowhitespace: true
},
notEqual:{
	required:true,
	notEqual: "Your Name"
},
date:{
	required:true,
	date:true
},
letterswithbasicpunc:{
	required:true,
	letterswithbasicpunc: true
},
alphanumeric:{
	required:true,
	alphanumeric:true
},
lettersonly:{
	required:true,
	lettersonly:true
},
required:{
	required:true
}
If you want to validate a field , so user have to put numbers only, you have to add this in element you want to validate:
name="number"
If you want some custom rules you have to change the validation rules inside the js-func.js file. Here:
( form ).validate({
	/*** here are the validation rules. the elements are get by name attribute ) ***/
	/********************HERE YOU CAN CUSTOMIZE THE STOCK VALIDATION RULES*******************/
	rules: {
		name: {
			required: true,
			minlength: 3
		},
		password:{
			required: true,
			minlength: 5
		}
		....
If you want to learn more about the usage of the plugin go to their home site http://jqueryvalidation.org/
Your Name